Welcome to another post from serie Back2Basics – this time I want to show you how to add your own, custom domain to the Microsoft 365 environment. When you do that – you will be able to use your own domain with your account, so no more usage of onmicrosoft.com domain!
In my case – I will use mvplab.top domain and OVH as domain registrant.
First, you need to open Admin Center and go to the Settings > Domains and click on the button Add domain

Type domain name and click on the Use this domain button

Next option what you need to choose is how you want to confirm ownership of this domain.

I will select the first one – Add a TXT record to the domain’s DNS records.

Here is an example what you should use in your domain registrant.
On my case at OVH will looks like:

On the “How do you want to connect your domain?” step select how do you manage the DNS records. You can move DNS service to the Microsoft, and manage additional DNS entries via the Microsoft services, but preferred option is to stay on external service, so I will select: Add your own DNS records

Basically, there are only three required records – for Exchange and Exchange Online protection.
You can add also records for Intune and Mobile Device Management for Microsoft 365 and… Skype for Business. There is also possilibty to add DomainKeys Identified Mail (DKIM) but about this – will write some article later.
I will select records for Exchange and Intune.
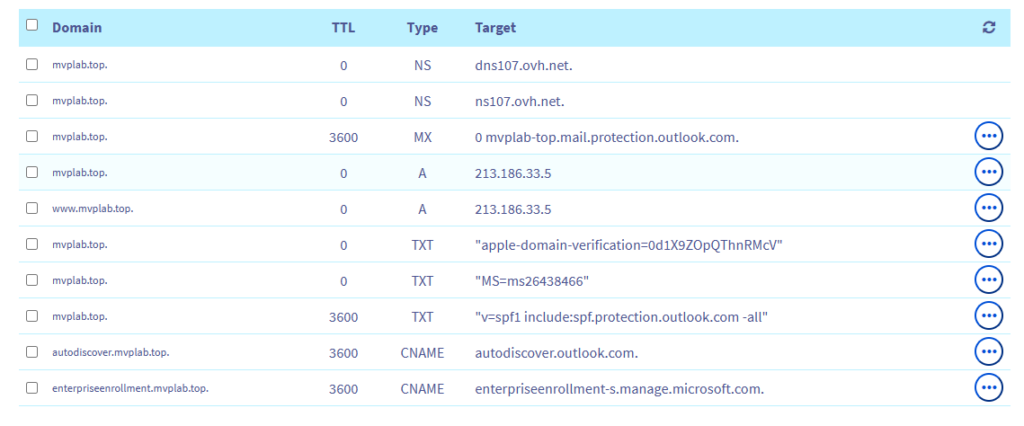
When records will be filled properly – they should looks like:

And you will see information that Domain setup is completed.

Now you can manage edit domain for your end users, so as I wrote earlier – no more onmicrosoft.com domain 🙂
You can check all entries from B2B series on this link.


